A Guide to Agenteering
(14 Feb 2024)
A guide to making agents for Creatures 3 and Docking Station using Theist.
I've archived the original 2006 Mac-centric version of the guide here in case you're feeling extra nostalgic.
Table of Contents
Prepare Yourself
Get the Tools
- Theist
- Spritist
- A code-friendly text editor (such as VSCodium or another free text editor, or even Notepad in a pinch)
- (Optional) A graphics editor (such as Blender for 3D, GNU Image Manipulation Program for 2D, or a pixel art editor like Aseprite for pixel art)
- (Optional) A sound editor (such as Audacity)
References to bookmark:
Reserve Classifiers
Every type of object in the game is identified by a unique classification number. If your agent uses a number already being used by another agent in somebody's world, it'll cause some weird things to happen.
To avoid conflicts, it’s best practice to reserve some scripts for your agents at the Creatures Caves website. (Note: You’ll need to make an account to reserve script numbers. For the best security, remember to use a unique password and change it regularly.)
Agent-Making Time
We're going to use Theist and Spritist to put together our sample agent, the Bubble Blower. We'll get more into the details of how to draw sprites and write scripts later on, but for now we'll use some pre-made files to walk through the overall process of making an agent and getting it into the game.
Create a Sprite File
Creatures 3 and Docking Station use a sprite file format called C16, which stores multiple image frames in a single file. We can use Spritist to create a C16 sprite from a series of PNG files - in particular, these sample images for our bubble blower. Go ahead and download and unzip them, then load up Spritist.

Click the "New" button to create a new sprite.

Click the "Insert Image" button and select the PNG files one at a time - or just drag all the PNGs into Spritist to add them all at once.

There we go! We can see all the frames for our sprite. Note: Since everything in the game refers to images by frame index number, make sure the order of frames matches the screenshot here - if not, drag them into the right order.
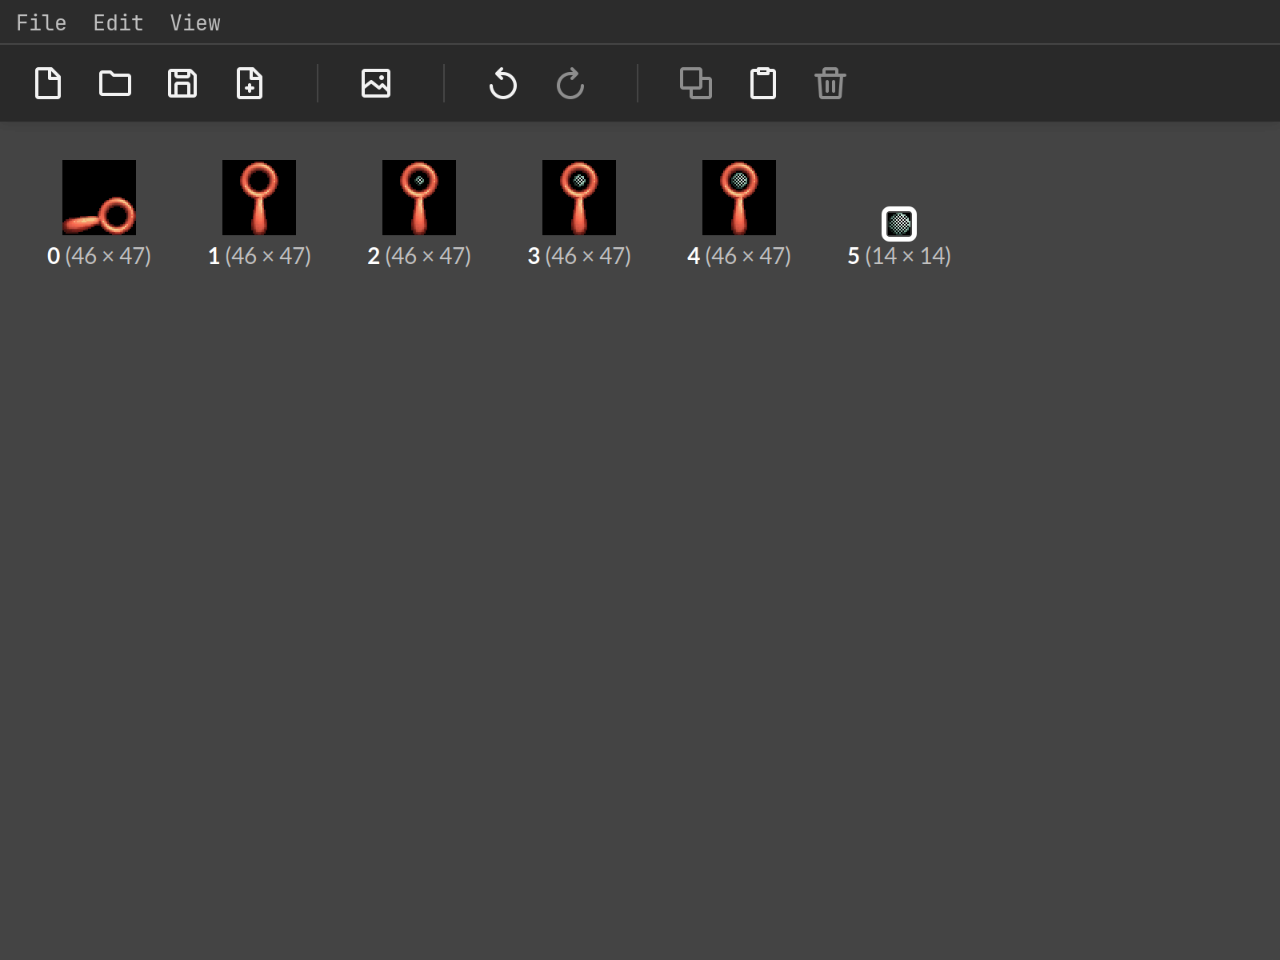
Click the "Save" button and save your sprite as "bubble_blower.c16".

Create a Catalogue File
A catalogue file contains the help text that comes up when a player right-clicks on an agent with the "?" turned on. It's just a text file with the file extension set to ".catalogue" and a pretty simple format for each entry:
TAG "Agent Help [classifier]"
"[agent name]"
"[agent description]"
So in our case we have both the bubble wand and the bubbles themselves. We can put them in the same file like this:
TAG "Agent Help 2 21 999"
"Bubble Blower Wand"
"A wand to blow bubbles for your creatures."

TAG "Agent Help 2 21 1000"
"Bubble"
"A wandering bubble. So delicate!"
You can copy and paste that into your favorite text editor (even just notepad.exe) and save it as "bubble_blower.catalogue", or just download the pre-made catalogue file and unzip it.
Create a Script File
Next up, we create our script file. What script file? Why, this script file! That’s right, I’ve already written a bubble blower script to get us started. More on scripting lies ahead.
Add Dependencies
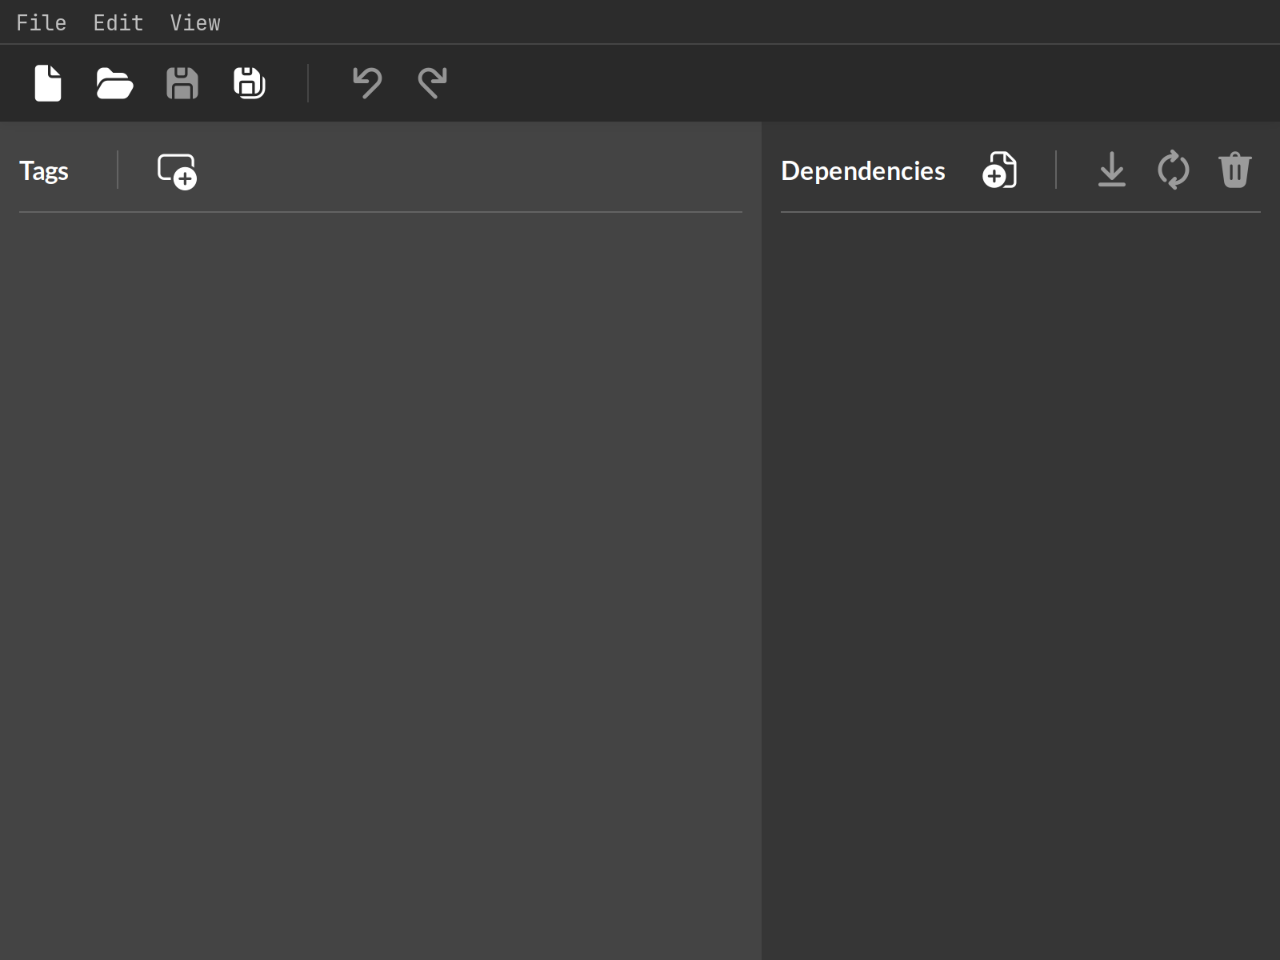
Open up Theist and we're ready to start creating our agent file. Notice that the window is divided up into two columns: tags on the left, and dependencies on teh right. We'll get to tags in a moment, but for now let's focus on dependencies.
Dependencies are the files that get bundled up in our agent file. When we inject an agent into our game, these files get added to the appropriate folders in the install directory. Essentially an agent file is like a ZIP file specifically for Creatures 3/Docking Station.
We'll start by adding the three files we just created - bubble_blower.c16, bubble_blower.catalogue, and bubble_blower.cos. Either click the "Add Dependency to Agent" button add them one at a time, or drag the files into Theist to add them all at once.

And there we go, all our files are added as dependencies, and will get packaged into the agent file so our agent can use them in the game.

Add a DS Tag
A single agent file can actually hold multiple agents. Each one is defined by a tag. In fact, since C3 and DS are technically separate games that can be played independently, each game will need its own tag if we want our agent to show up in both injectors. We can add the first one by clicking the "Add Tag to Agent" button.

Theist will ask what kind of tag we want to create, and we'll choose "Add Agent Tag." (We can see there are also egg tags and garden box tags, but for now we’re going to stick to agents.)

Now we can see all our agent tag properties! It's defaulted to making a DS tag first, which is fine. We'll make the C3 tag by duplicating this one after we fill out all the fields so we don't have to do it all twice.

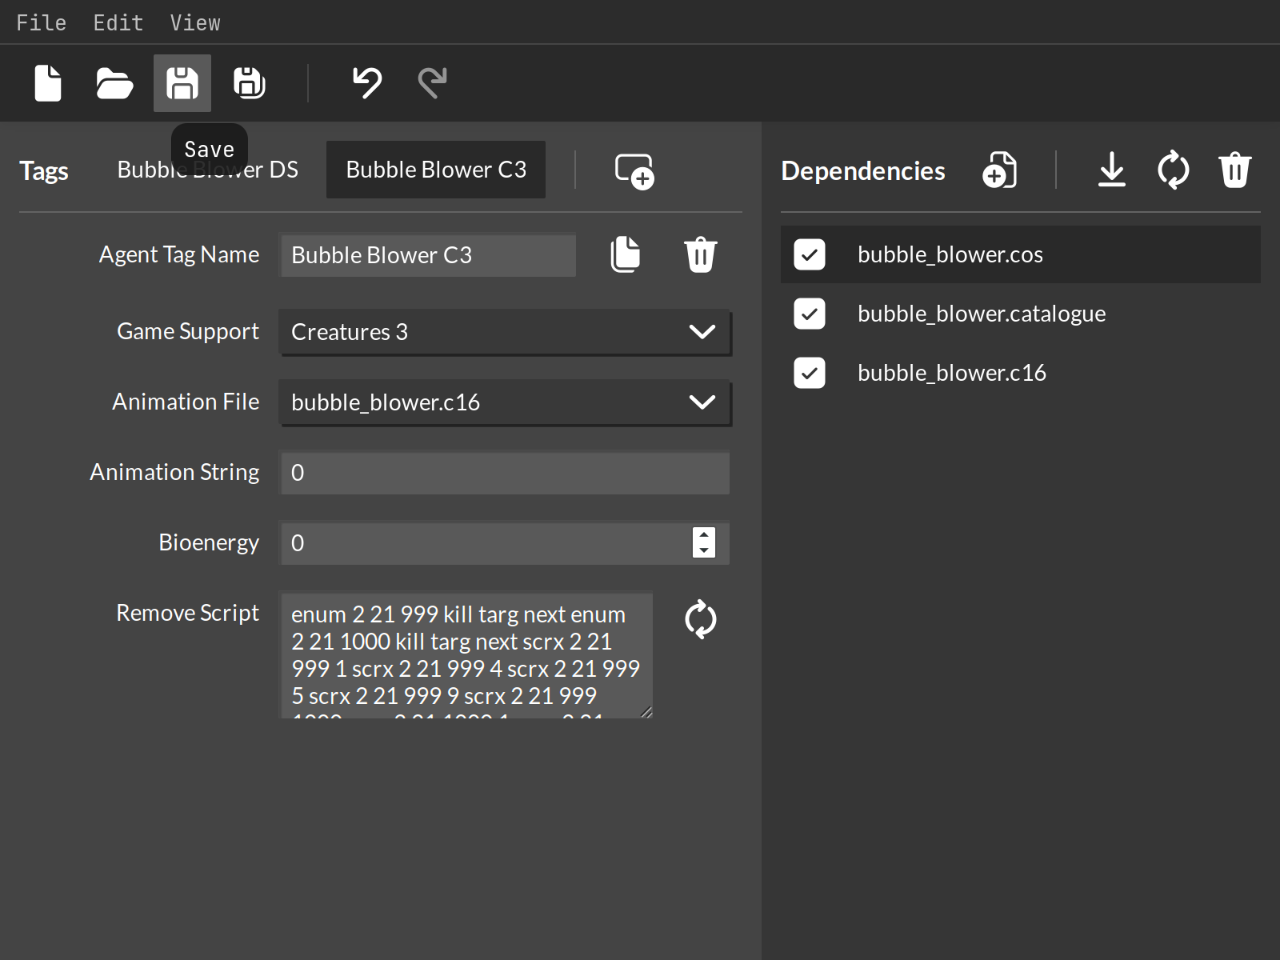
Our dependencies are all de-selected by default for new tags. We want our DS tag to include all three of them, though, so we should check them all.

Let's give our DS tag a name with the Agent Tag Name field. This is how it will show up in the injector.

Since we already added a sprite file, we can set our injector image to use it by choosing it from Animation File dropdown.

We can use an Animation String to show an animated preview in the injector, but for now let's keep it simple by just showing the first frame of the sprite. (If we wanted to use a different frame for the injector, we'd want to change the Sprite First Image number as well as the Animation String.)

Let's write a description for the injector. (You can add translations for other languages that the game supports using the + button.) For now we'll skip the Web Label and Web URL, but if you have a website, you can fill in those fields if you like.

The remove script is what gets called when a player clicks on the "⊘" button on the injector. Since our script file already includes a remove script (rscr), we can click the "Generate Remove Script" button to get Theist to extract it for us.


Add a C3 Tag
Creating the C3 tag is as easy as clicking the "duplicate tag" button for our DS tag.

It copied over all our info!

Let's give it a more appropriate name...

... and set the Game Support selection to Creatures 3. The C3 injector shows much less info than the DS injector, so there are fewer fields to fill out. (On the other hand we can set the Bioenergy value, but since the bubbles blower isn't organic material, we can probably leave it at 0.)

Save the Agent
Traditionally, saving everything into an agent file is called "compiling." But in Theist we just need to click the "Save" button and choose a location to save the agent file to. That's it! All the dependency files and tag info will be saved inside, ready to be injected into the game or opened by Theist at a later date if you need to change anything.
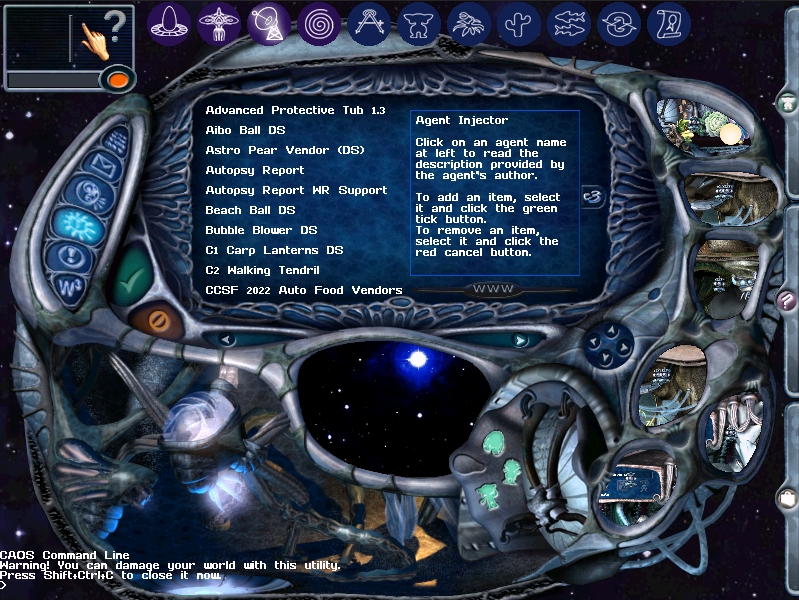
Try It Out
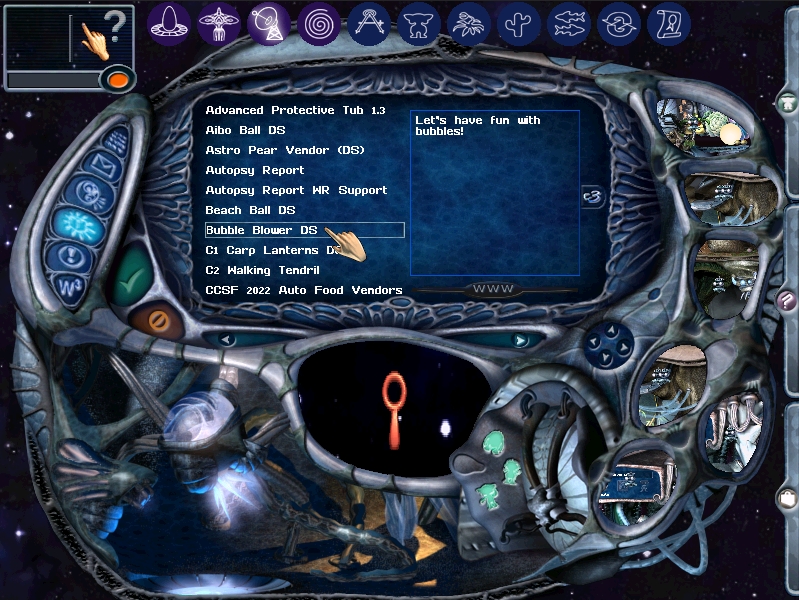
Now let’s try it out in the game. Copy your agent file to the Docking Station/My Agents folder, wherever you’ve installed your copy of the game. When you start the game, you should be able to find the Bubble Blower in the Docking Station comms room. Press the green check button, and et voila, your bubble blower should magically appear!
For Creatures 3, the steps are the same, except you copy your agent file to Creatures 3/My Agents instead. Now it will show up in the Creatures 3 injector in the ship’s engineering bay even in undocked worlds.
Updating Files
An agent file is kind of like a zip file - it compresses all the files an agent needs into a single file. When you first inject an agent, the game extracts all the files and puts them in the right folders. Except for scripts, which get put into the world itself. From then on, the agent file itself is just used to show the agent in the injector. That means that if you change the sprites, sounds, or catalogues for your agent after you’ve injected it into any world, you have to find and delete the old versions so the game can replace them with your new versions - or replace them manually if you prefer.
- Sprites: Docking Station/Images
- Sounds: Docking Station/Sounds
- Catalogues: Docking Station/Catalogue
Note that if you want to see the new version of your agent show up in the Docking Station injector - even you just changed the name, description, or injector preview - you need to do the following dance:
- Delete the original agent file from Docking Station/My Agents.
- In the Comms room, switch views from the injector to something else and back again. The agent will be removed from the list, forcing the game to re-scan the file when you add it again.
- Add the new agent file to Docking Station/My Agents.
- Switch views in the Comms room again. Your agent will be back in the list, and this time it will be the updated version.
Advanced Testing
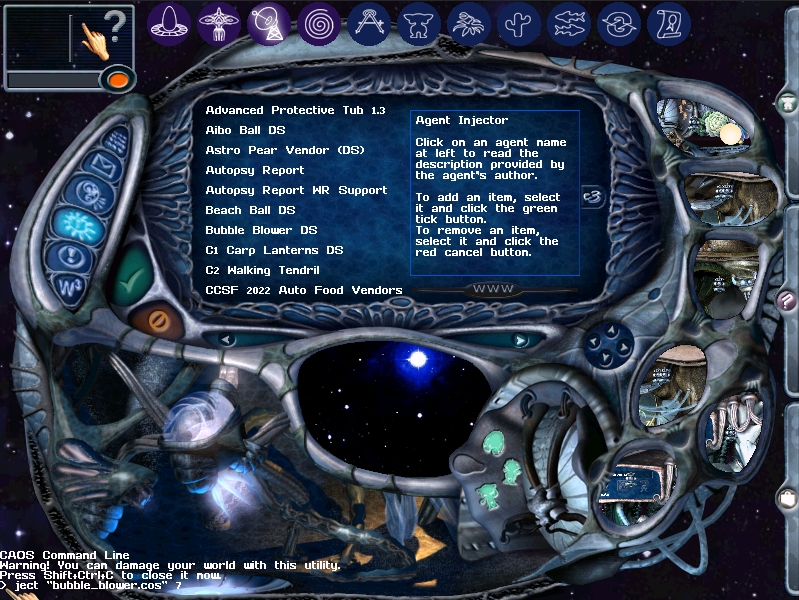
It can be annoying to have to re-compile and re-inject your agent every time you update the script, especially in the early stages when you might need to make lots of small changes. There’s a trick you can do to get your script in the game faster: put your ".cos" file directly in the game’s bootstrap folder and inject it manually.
Move your script file to Docking Station/Bootstrap/010 Docking Station (or any folder in Bootstrap, you can even make a new one for testing purposes). In the game, you can open the CAOS command line with CTRL+SHIFT+S and type
ject "bubble_blower.cos" 7
(or whatever your script file is named). This will run the remove script and re-inject the agent - assuming you’ve injected it before, or at least copied the sprites and sound files manually into their proper game folders. You can then edit the script from there, and keep ‘jecting it all you want.

Just remember to move your script file back into your project folder when you’re done, otherwise it won’t get included in your compiled agent.
Also note that all scripts in the Bootstrap folder will be injected into any new worlds you create, so make sure you delete your test script from the Bootstrap folder when you’re done and avoid making new worlds while you’re in the middle of testing.
Look Smart with Sprites
Come Up with a Concept
Every agent starts as an idea. It helps to sketch pictures of what you want your agent to look like, and think about how your agent will behave. If you outline the poses and animations your agent will use, you won't have to spend as much time drawing sprites you won't need. You can also start a folder dedicated to all the files for your agent, just to keep things nice and organized.
Do Some Drawing (or Modeling or Photography)
The official Creatures 3 and Docking Station sprites use 3D models that have been exported as 2D sprites, sometimes with additional polish added on top of that. You don’t have to start with a 3D model if you don’t want to, though. You can edit a photo of an object, scan a hand-made drawing or painting, or draw your agent digitally.
Tips:
For 3D models, set your camera to orthographic.
For lighting, set up lights in your 3D modeling software or, in 2D graphics software, use a soft brush on a layer with an additive blend-mode. Give your object a cool white light coming from above or upper-right, and a dim blue or orange under-glow for ambience.
Take screenshots of the game to reference or use as a background layer to see what your agent will look like in the world.
It’s ok if your sprites aren’t perfect, or don’t fit the game’s official style. There’s a wide variety of art styles in community creations, and players are always happy to have new stuff in the game.
It’s a good idea to use rougher sprites while first creating and testing the scripts for your agent, and then come back and add polish when you have your agent working the way you want.
Tweak the Images
The important thing is that you end up with one PNG file per frame, with a transparent background. Most graphics editors will let you export your work as PNG files, so that shouldn’t be a problem. The Creatures games actually have their own image formats (S16 and C16), but Theist will take care of the conversion for you.
Tips:
Avoid extra blank space around your image. Many editors have a "trim" function that will automatically do a tight crop.
If your agent will change pose or animate, make sure each sprite in the sequence is the same width and height.
Creatures 3/Docking Station don’t support anti-aliasing/semi-transparency, so make sure all pixels are fully opaque or fully transparent. You’ll probably need to clean up the edges - it’s common to use a darker color around the edges of your sprites to help them look more polished, while avoiding an "outlined" look (but it really depends on the style you’re going for).
Stick to the Script
Order From CAOS
When we put together the Bubble Blower, we used a pre-made script. Go ahead and open it up in a text or code editor: you’ll see it’s just a lot of comments (the lines that start with asterisks) and short, mysterious commands (the lines that start with four-letter words followed by numbers).
The mystery commands are the actual code that makes the agent function. The comments are just for us. The Creatures game engine uses its own scripting language called CAOS, for Creatures Agent Object Script. It’s simple and efficient for the game, but not very readable for humans, so it’s best to have a copy of the CAOS Docs on hand to look up what the (many, many) commands do.
Let’s walk through the Bubble Blower script line by line so you understand all the parts well enough to mess around with it or make something from scratch.
Create a New Object
The first command in most scripts is inst, which tells the game to do everything that follows in one game tick - practically instantly. That way nothing else can interrupt it while it’s creating the object and setting all its properties.
* everything that follows happens in one tick (instantly)
				inst
Next, we’ll create the actual object. It doesn’t have any moving parts or anything, so we’ll use new: simp to create a simple object. Unlike inst, new: simp has a number of arguments that follow - numbers and strings (bits of text enclosed in quotes) that specify details about the command.
* create new object
new: simp 2 21 999 "bubble_blower" 5 0 4000
The first three numbers, 2 21 999, represent the unique classifier for our object. The first number, 2, is the family. In this case it’s an object that lives in the world. The second number, 21, is the genus, which is basically what word a norn would use for it. In this case, it’s a toy. Finally the third number, 999, is the species. This is unique to the bubble blower wand. There could be a different object in 2 11 999, but if anything else uses 2 21 999, the game will think they both share the same properties and scripts. That’s why it’s a good idea to reserve classifiers for the stuff you make. Don’t worry though - there are plenty to go around! We won’t run out anytime soon.
The next argument is a string, "bubble_blower". This is the name of the sprite file this object will use. The 5 means it’ll use 5 frames, and the 0 is the base, meaning frame 0 is the first of those five frames (the rest counting up from there, so 1, 2, 3, and 4).
The last argument, 4000, is the plane the object sits on. The higher the number, the closer to the front of the screen it is. It’ll appear in front of any object with a lower plane. This is just a good number for toys, since it’s kind of in the middle: in front of the norns and most plants and environmental objects.
ATTR and BHVR
Agents have two properties that determine what the Hand/the world can do with it, and what creatures can do with it: ATTR and BHVR.
* set attributes: can be carried by agents (+1),
* hand can pick it up (+2) and activate it (+4),
* and affected by collisions (+64) and physics (+128)
attr 199

* set behaviors: creatures can active 1 (push) it (+1),
* and pick it up (+32)
bhvr 33
The value of these properties is determined by adding together a bunch of numbers representing individual things that can affect the agent. It’s not worth memorizing this system, just use an ATTR + BHVR calculator.
For the bubble blower wand, we’re going to use some pretty common values for basic toys.
Physics Properties
The Creatures engine has a 2D physics system, so we need to set a bunch of properties on our agent so it behaves the way we want when it’s dropped or thrown.
* set gravity
accg 3

* set permeability
* (what kinds of surfaces it will fall through)
perm 60

* set elasticity
* (how much it bounces)
elas 0

* set friction
* (how much it slides on the ground, eg. when dropped on slope)
fric 100

* set aerodynamics
* (how quickly it slows when going through air, eg. when thrown)
aero 2
There’s also the puhl command for setting the x/y offset on the sprite to a more reasonable place for the hand to pick it up from. This puts the opening of the wand above the hand, so it looks more like how it would be used in real-life.
* set the offset for where the hands picks it up
* (-1 = set for all sprites)
puhl -1 20 55
Injection Boilerplate
To make the agent appear in the right spot from both the C3 and DS injectors - and not error out if you only have C3 installed - there’s some standard code that we can use.
* boilerplate for placing agent after being injected
* from either C3 or DS

doif game "CreatorX" ne 0 and game "CreatorY" ne 0
    mvsf game "CreatorX" game "CreatorY"
else
    mvsf 5440 3580
    velo rand 30 40 -5
endi

doif room targ eq grap 5440 3580
    mvsf 5440 3580
    velo rand 30 40 -5
endi
That’s it for getting the agent into the world. Next up, we’re going to add some scripts to get it to do stuff when the Hand or a creature interacts with it.
Activation Script
When the Hand or a creature pushes an agent, its Activate 1 script is called. Scripts start with the command scrp, followed by the agent’s classifier, followed by the script number - in this case, 1. The end of the script is marked by endm.
* activate 1 script
scrp 2 21 999 1
    ...
endm
So what do we put inside? Well, we definitely want creatures to know they’ve played with a toy so they get those happy chemicals released.
* reward creature for playing with a toy
stim writ from 97 1
We also want to animate the bubble blower wand by telling it to move through a series of sprite frames - it stands upright and then shows the bubble inside getting larger and larger, before returning to the original bubble-less frame. The bubble is now free to be its own separate agent - but first we need to tell the script to wait for the animation to finish with the over command.
* animate wand
anim [1 2 2 3 3 4 4 1]

* wait for animation to stop
over
Now that the bubble is fully grown, it’s time to create a new agent for the bubble. Since there are several ways to create bubbles with the wand - another is to hold it and wave it around to auto-generate bubbles on a timer - I’ve put the code for this in a custom script. User-defined scripts like this are safest to start at script number 1000, well away from any system-defined scripts (like this very Activate 1 script). We’ll get to the definition of that later - for now we just want to call it.
* call create-bubble script
call 1000 0 0
With the bubble on its way, the wand can collapse to the ground again by changing its frame with pose. We’ll just wait a few ticks first so it feels more natural.
* wait 5 ticks
wait 5

* change sprite
pose 0
That’s it! Not the simplest script, but with a more basic toy you can always get away with just writing a stim and running an animation.
Pick-Up Script
When the bubble blower is picked up by Hand or creature, script number 4 is called. We want to change the frame to the upright wand, and start blowing those bubbles. In the timer script we’ll start making bubbles automatically, so here we just need to set the rate at which the timer script is called with tick.
* pick-up script
scrp 2 21 999 4

    * change sprite
    pose 1

    * start timer at a rate of every 5 ticks
    tick 5

endm
Drop Script
The opposite of the pick-up script, the drop script - number 5 - needs to stop the timer and change the frame so the wand lies on the ground again. (Once again we’re using wait to make the frame-change feel more natural.)
* drop script
scrp 2 21 999 5

    * stop timer
    tick 0

    * wait 5 ticks
    wait 5

    * change sprite
    pose 0

endm
Timer Script
The bubble blower is going to blow bubbles continuously while it’s being held. That’s why we set the timer rate with tick 5 in the pick-up script, and stopped the timer with tick 0 in the drop script. That way the timer script - script number 9 - is called every five ticks while the Hand or a creature is holding the wand.
The code is going to look similar to the activate script. The wand will animate blowing a bubble, and when that animation is over, a new bubble will be created by calling our custom script.
* timer script
scrp 2 21 999 9

    * animate wand
    anim [2 3 4 1]

    * wait for animation to stop
    over

    * call create-bubble script
    call 1000 0 0

endm
Blowing Bubbles
Now for the big one: our custom script for creating bubbles, script number 1000. This is going to look similar to how we created the bubble blower wand, starting with an inst to make sure the rest of the script can’t get interrupted halfway through.
* custom create-bubble script
scrp 2 21 999 1000

    * everything that follows in this script
    * happens in one tick (instantly)
    inst
Before we can create the bubble itself, we have to store the wand’s current position so the bubble can show up in the right spot. The reason we have to do this ahead of time is because once the bubble is created with the new: command, all further commands in the script target the new agent.
We can store the wand’s positions in some local script variables, va01 and va02, so we can use them later. Script variables are attached to the script, not the object, so they don’t care about the target object. They do disappear once the script ends, though. (If you do want to store variable data in the object instead, you can use ov01 - ov99. Just be aware that each agent has its own set of object variables, so if you switch targets, you’re going to be accessing a different set of object variables.) The command setv takes a variable and then a value to store in it, in this case the positional data from posx and posy.
* set variables 1 and 2 to the wand's x and y positions
setv va01 posx
setv va02 posy
That’s the center of the sprite, though, and won’t place the bubble at the opening of the wand. We have to do some math. CAOS provides addv and subv to add and subtract from the value stored in a variable.
* subtract some values from variables 1 and 2
* so bubble will appear in the right place
subv va01 7
subv va02 13
Ok, now it’s time for new: simp. We need a different classifier from the wand, so we’ll use 2 21 1000. And since bubbles only need one sprite frame - the sixth frame in the sprite file - and we want to put the bubbles a little in front of the wand, the full line looks like this:
* create bubble (this changes target
* of commands to the newly-created bubble)
new: simp 2 21 1000 "bubble_blower" 1 5 4100
Next up is our regular bunch of attributes, behaviors, and physics properties, albeit with some slightly different values from the wand since bubbles are practically weightless and are meant to just float around:
* set attributes: hand can pick it up (+2) and activate it (+4),
* and affected by collisions (+64)
attr 70

* set behaviors: creatures can active 1 (push) it (+1),
* and pick it up (+32)
bhvr 33

* set physics properties
accg .1
perm 60
elas 0
fric 50
aero 0
Remember those local script variables holding onto the x and y positions for the new bubble? Now it’s time to use them. The move-safely command, mvsf (this makes sure it won’t end up stuck in a wall by accident), conveniently takes an x and a y argument. So we can plug in the values stored in va01 and va02 to move the bubble to the right spot.
* move to the x, y coordinates stored in variables 1 and 2
mvsf va01 va02
Once the bubble is positioned let’s give it a little push in a random direction by using the velo command to set the x and y parts of its velocity. The rand command lets us use a random number between -1 and 1 for each part.
* set a random initial velocity
velo rand -1 1 rand -1 1
To add some continuous movement - and an eventual pop - we’ll use a timer script for the bubble and set the rate to something random.
* start timer
tick rand 10 20
When we’re done with the bubble, we can target the original owner of this script again - the wand - with targ ownr. This may not be strictly necessary at the end of a script, but I included it here in case you want to mess around with the script and add additional wand-targeted code after the bubble is created and sent on its way.
* return target of commands from bubble
* back to wand (the owner of this script)
targ ownr
And that’s it for the last of the bubble blower wand scripts. On to the scripts for the bubble itself!
endm
Bubble Scripts
You now know everything you need to understand most of the bubble scripts.
* activate 1 script
scrp 2 21 1000 1
    * call pop-bubble script
    call 1000 0 0
endm

* pick-up script
scrp 2 21 1000 4
    * stop timer
    tick 0
endm

* drop script
scrp 2 21 1000 5
    * start timer at a rate of every 10-20 ticks
    tick rand 10 20
endm
In the timer script, we introduce a bit of flow control, some branching code. Doif will only run the commands under it if some condition is met, in this case when a random number between 0 and 9 is equal to 0 - in other words, a 1 in 10 chance. Anything under else will run if that initial condition is not true, so the other 9 in 10 chances. Finally it’s wrapped up with endi - any code after that runs normally.
* timer script
scrp 2 21 1000 9
    * 1 in 10 chance for bubble to pop
    doif rand 0 9 eq 0
        * call pop-bubble script
        call 1000 0 0
    else
        * if bubble doesn't pop,
        * change velocity in random direction
        velo rand -1 1 rand -1 1
        * reset timer at a new rate of every 10-20 ticks
        tick rand 10 20
    endi
endm
When the bubble pops, we play a sound effect with sndc and then destroy the bubble - the current target object - with kill targ.
* custom pop-bubble script
scrp 2 21 1000 1000
    * play popping sound effect
    sndc "pop_"

    * wait 5 ticks (for sound to finish playing)
    wait 5

    * delete bubble
    kill targ
endm
Remove Script
The last step is to create a remove script to fully delete the agents and their scripts from the world when the player presses the remove button on the injector.*
The remove script starts simply enough:
rscr
To remove all the wands and bubbles, we use the command enum to look at all the agents with a particular classifier, one at a time, like it’s going through a checklist. The current item in the list is the target of the following commands, which means we can remove the agent with kill targ. Then next picks the next agent in the list, until there aren’t any more agents with the specified classifier.
* remove wand
enum 2 21 999
    kill targ
next

* remove bubbles
enum 2 21 1000
    kill targ
next
That takes care of the agents themselves. We also want to remove the scripts we created for them, which we can do with scrx (basically the inverse of scrp).
* remove wand scripts
scrx 2 21 999 1
scrx 2 21 999 4
scrx 2 21 999 5
scrx 2 21 999 9
scrx 2 21 999 1000

* remove bubble scripts
scrx 2 21 1000 1
scrx 2 21 1000 4
scrx 2 21 1000 5
scrx 2 21 1000 9
scrx 2 21 1000 1000
Removing scripts is especially important to do while developing agents to avoid unexpected behaviors. Once you create a script, it sticks around in your world’s scriptorium and continues to affect any agents with its classifier until you overwrite or remove it. For example, if you want to let bubble timer keep running even while the bubble is being held, you don’t need the pick-up or drop scripts anymore - but you would need to run scrx on those scripts to stop them from affecting your bubbles. In the final version of your cos file you shouldn’t remove scripts you aren’t also defining, you just need to keep this in mind while you’re still messing around. You can also run scrx from the CAOS command line.
* Traditionally the remove script here in the script file only gets called when using the ject command from the CAOS command line. You’d need to separately define the one used by the in-game injector in the PRAY source file, which usually just meant copying it from the script file and pasting it into the PRAY file (and removing all line breaks). Theist makes it easy to just write it once by setting the Remove Script property to Auto. It will scan the first script file for the remove script, and do the copy-paste-line-break-removal dance for you.
Moving On
It’s time to strike off on your own agenteering adventures!
Make a README File
When you share your agent, you probably want to let people know what they’re getting into. It’s best practice to include a text file, readme.txt, with the following info:
Your name (the one you use in the community, doesn’t have to be your real name)
Your website URL, if you have one
Name and description for each agent
The version number - start at 1.0, and if you need to make changes in the future, you can bump it up to 1.1, 1.2, etc. and list the changes for each version
Zip It Up
With your agent file (or files) and readme.txt, zip them up so you can distribute them together.
Share It Far and Wide
There are three main places you can share your work:
Discord - Creatures Discord and The Norn Nebula
EemFoo Archive - right now you can add things by sharing in the EemFoo Archive Discord
Learn More
- Creatures Development Network
- Awesome Creatures Development Resources
- Creatures Development Standards
- CAOS Coding Cave (Discord)
Many Thanks
Original 2006 guide: Thanks to Moe, Spook, RProgrammer, and Malkin
Updated 2023 guide: Thanks to Amaikokonut for some awesome CAOS tools, 20kdc for help with Theist, and EemFoo for support and encouragement!